Blogger Layouts
We are a group of friends/parents that run a not-for-profit cultural association in Spain.
This is our (bilingual!) blog about our theatre workshops for kids...
Mostrando entradas con la etiqueta Costumes. Mostrar todas las entradas

miércoles, 3 de abril de 2013

Looking for inspiration.... monster masks!

I'm busy thinking about this summer's play - Rotten Island - which we'll do with the kids from the village. At the moment, it's all monsters, monsters, monsters.... How to do the monsters?! I absolutely love these from Brutal Knitting but is life too short?

http://www.geekologie.com/2012/12/28/monster-masks-4.jpg
 

lunes, 24 de septiembre de 2012

Prop-making III: light sabres!

No play about aliens and space travel would be complete without a light sabre or two. And if you are doing a play with 22 kids, you are obviously not going to get away with just a couple of them, either! So, this year we had to come up with 20 light sabers. And naturally, since we had access to black lights, they were going to have to glow in the dark!

First thing to remember about black light: normal white paper reacts incredibly well! So, all we had to do was to wrap our light sabers in white paper and keep the lights on during the battle scene.


We wrapped lengths of irrigation tubing in foam (for safety!), leaving a handle length at the end. Then we glued on strips of white paper (papier maché style) with runny white glue.And voilà!


Rehearsing with the light sabres:


To make the light sabres glow, we had the black lights on throughout the whole performance. The paper reacted even with the other lights on, giving the sabres a very "realistic" glow.

We turned the lighting on and off during the alien battle scene (like a very slow strobe effect) and the children assumed different fight poses every time the lights went off. In these moments, all you could see were the sabres glowing spookily:

See the whole play here.


lunes, 23 de julio de 2012

Summer 2012: Props.... Making UFOs

For our galactic version of Romeo and Juliet we are working on in this year's workshop, we need 8 UFOs. These are for the smaller kids to wear during the "rivalry scene" and for a chorus of 4 of the older boys during the "love scene" choreography.
They need to be:
  • lightweight
  • easy to put on and off 
  • cheap to make (!)
I'm thinking they can be worn around the waist, with shoulder straps to stop them slipping off. Something like this:


So we have had a series of ideas.
Idea one:
Two cardboard "cones" with tops cut off taped together, covered in tape or a thing layer of paper mache and spray painted silver

The snag:
No real snag, except finding enough cardboard boxes in a remote mountain village..... it's just too hot to contemplate at the moment (! but we may come back to this idea!)

Idea two:
We move on to a ready-made shape - the swimming ring. This, we think, might even be able to sit snugly on the hips of the bigger kids without shoulder straps. We buy two, in different sizes, wrap with tape as a base... and find them deflated in the morning. This creates a dilemma: are we back to paper mache (moving fast before the air comes out?) or should we abandon the idea?
Idea three:
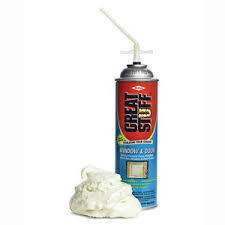
Rubber rings filled with insulating spray foam! This was not an outright failure (before I embark on the debacle) but it wasn't an instant resounding success! The idea was to fill the ring with foam (blocking any air holes in the process) and wait for it to expand to fill the ring. If you are interested in this idea, a few observations:
  • we filled the ring from various points, making a small hole with scissors where necessary
  • you can't use th ready-made nozzle because of the valve (duh)
  • the foam does not expand as expected (lack of air? foam plus air in a confined space means lack of room?)
  • it takes longer to dry than expected (again, this may be lack of air - perhaps air holes would work?)
  • blow the ring up first but be prepared to let air escape quickly as the foam expands - the ring will suddenly get very overfull!
In the end, after several days, the foam DID dry and the ring became firm all round, but it has air pockets (actually large gaps between the foam "blobs"). Sooooo.... if we hadn't come up with our next idea, I am confident this method would give results (in case anyone is researching the idea).... it just might need tweaking. Another idea, along the same lines (again for any foam fanatics out there) would be to blow the ring up and seal the edges and the valve with spray foam before smoothing with a cutter when dry.

Idea four (the One, if all goes well!):
Having mulled the cost of the spray foam and the swimming rings, we decided to have one last ditch attempt at finding a cheaper solution. Having rung a nearby car tyre garage, we are now the proud owners of 16 punctured inner tubes... which (once we have mended them) we will hopefully be able to inflate, spray silver and decorate with... yogurt pot "ufo lights" and the like..... We'll see how it goes...

Any ideas for making a UFO costume/prop? Ever used spray foam for a project? Tell us all about it in a comment!

miércoles, 14 de diciembre de 2011

Starting from Scratch IV. The Costumes: hats

In recent weeks, I have been looking at the children's song "The Ugly Bug Ball" and showing how it might be turned into a children's play. One thing has become very clear as time has gone on - the variety of characters (bugs of all shapes and sizes) and the glamour of the setting (a ball!) means colour and flamboyance are paramount.  This is going to be particularly pertinent when thinking about the costumes.

When I think about the idea of insect costumes, immediately I think: hats, masks, capes. All three of these elements are relatively simple to make and easy for kids to wear. Let's look at hats first.

In order to come up with ideas, I first find an image of what I want to create. For example, the earthworm:


Then, I scour the internet, magazines, books, photos.... looking for ideas. These are some I came up with when i was thinking about making a worm hat:

The idea can come from anywhere (a straw basket?!) but you start to slowly get an idea. In this case, I'm leaning towards a tall, coiled hat (think Madge Simpson's hair, perhaps?). The black and red of the original photo would make a very striking worm hat or we could use earthy colours and weave in a few reds and greens.

Here are some ideas for hats for other creepy crawlies from the song which I got largely from looking at Ascot hats (what better place to look for flamboyance?). No offense to the original wearers!


Materials for making hats: netting, foam backed material, papier maché, felt, tubing, bubble wrap, bin bags... You don't always need a whole hat. Sometimes a headband will do and you can always think about adding elements to existing woolly, sun or base ball hats.

Some costume-making resources:

http://www.papiermache.co.uk/
http://www.alleycatscratch.com
http://sewing.about.com/od/halloween/a/costumetricks.htm
http://www.parenthacks.com/2006/10/nosew_modular_h.html
http://artswork.asu.edu/arts/students/tb/06_05_costumes.htm
http://blog.jugglingfrogs.com/2007/10/costumes.html


Related Posts Plugin for WordPress, Blogger...